Battery switch on travel trailer function is crucial for managing your RV’s power. Understanding how your battery switch works is key to preventing dead batteries, electrical issues, and maximizing your off-grid adventures. This guide will walk you through the different types of switches, their operation, maintenance, and troubleshooting, ensuring you’re ready for any situation on the road.
We’ll cover everything from basic operation and safety to integrating your switch with solar panels and other power sources. Whether you’re a seasoned RVer or a newbie, mastering your battery switch will give you peace of mind and keep your trailer running smoothly.
Understanding Battery Switch Functionality in Travel Trailers: Battery Switch On Travel Trailer Function
Your travel trailer’s battery switch is a crucial component, acting as the central control for your trailer’s power system. Understanding its function and operation is essential for safe and efficient use of your RV. This section will guide you through the different types, wiring, operation, and troubleshooting of these important switches.
Types of Battery Switches
Travel trailers typically utilize one of two main types of battery switches: a simple on/off switch or a more sophisticated multi-position switch. The simple on/off switch connects or disconnects the battery from the trailer’s electrical system. A multi-position switch offers more control, often including positions for connecting the battery to the trailer, connecting it to a charging source (like your tow vehicle), or completely disconnecting it to prevent battery drain.
Some higher-end models might even incorporate a combination of both, offering multiple options for charging and using the battery. Understanding which type you have is the first step in proper operation.
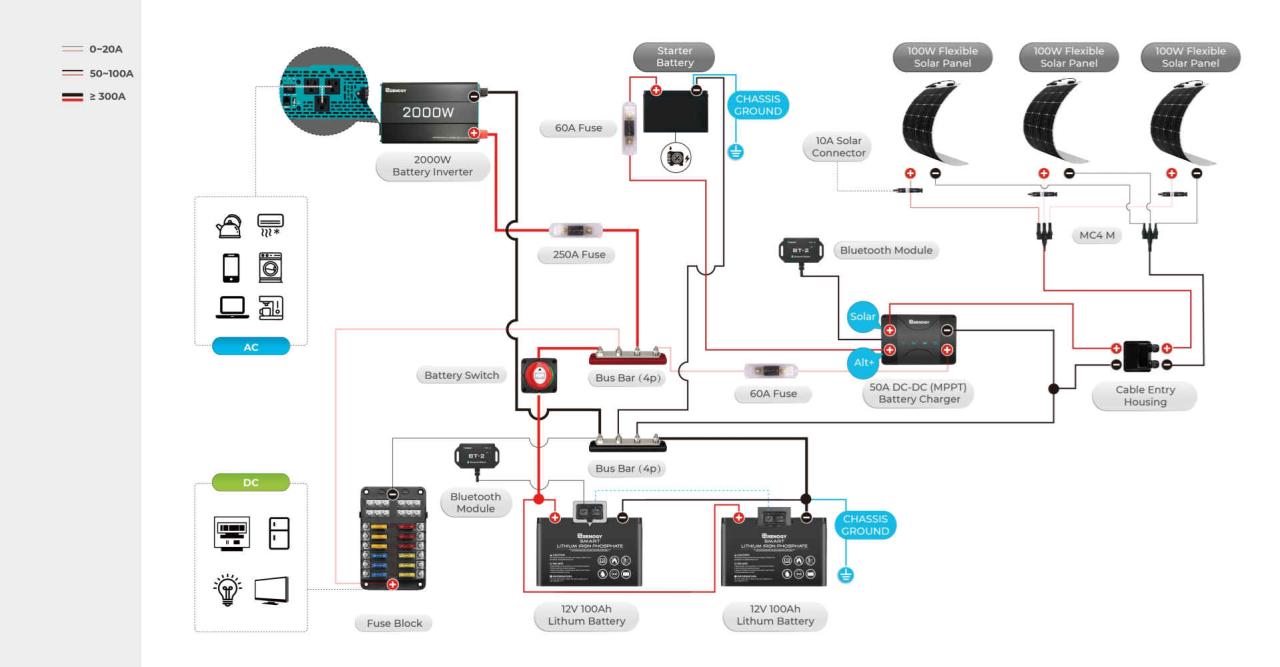
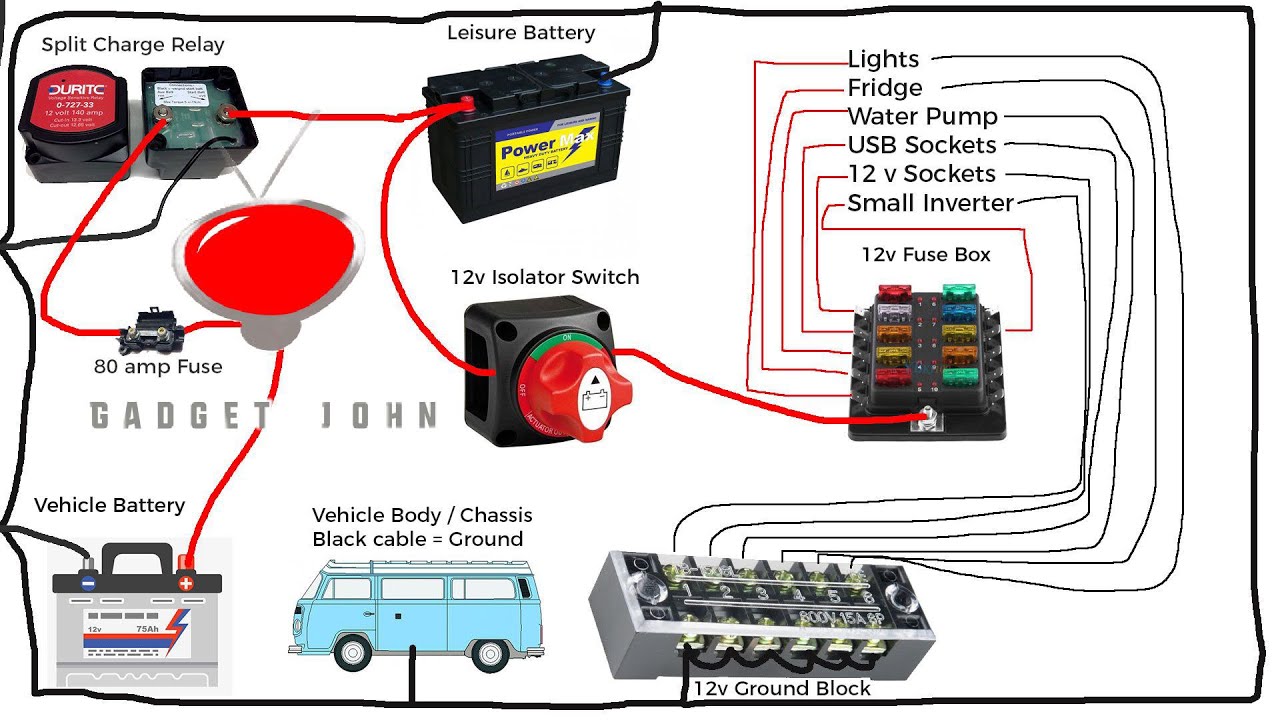
Typical Wiring Diagram of a Battery Switch System
A typical battery switch system involves several key components. The battery itself is the power source. From the battery, a heavy-gauge wire runs to the battery switch. From the switch, another heavy-gauge wire runs to the trailer’s 12-volt distribution panel. This panel then distributes power to various appliances and systems within the trailer.
A separate wire often connects the battery to a charging source, such as the tow vehicle’s charging system. This might connect directly to the battery or through the multi-position switch, depending on the setup. Fuses or circuit breakers are usually incorporated in the system to protect against overloads and short circuits. A visual representation would show the battery, the battery switch depicted as a multi-position toggle, the 12V distribution panel, and the charging source, all connected by thick wires with fuses strategically placed along the lines.
Operating a Battery Switch
Proper operation is straightforward but crucial. For a simple on/off switch, the process is simply turning the switch to the “on” position to connect the battery and “off” to disconnect it. Multi-position switches require a bit more attention. Each position will have a specific function clearly labeled (usually). Carefully read the labels to ensure you select the correct position for your needs – connecting to the trailer, charging, or disconnecting the battery.
Always ensure the switch is in the “off” position when not using the trailer to prevent battery drain.
Troubleshooting a Malfunctioning Battery Switch
If your battery switch isn’t functioning correctly, there are several steps to take. First, visually inspect the switch for any obvious damage, loose connections, or corrosion. Tighten any loose connections. If corrosion is present, clean the terminals with a wire brush and apply a corrosion inhibitor. If the problem persists, check the fuses or circuit breakers in the system.
A blown fuse or tripped breaker indicates a problem elsewhere in the electrical system that needs addressing before you work on the switch itself. If all else fails, it’s time to call an RV technician for professional assistance. Ignoring a malfunctioning switch can lead to further electrical problems or even fire hazards.
Maintaining and Troubleshooting the Battery Switch
Keeping your travel trailer’s battery switch in top shape is crucial for reliable power. Regular maintenance prevents frustrating breakdowns and ensures your batteries last longer. Neglecting this simple system can lead to dead batteries, inconvenient power outages, and potentially costly repairs.Preventative Maintenance Checklist for the Battery Switch and Related ComponentsRegular preventative maintenance significantly extends the lifespan of your battery switch and related components.
This involves a combination of visual inspections, cleaning, and tightening connections. Ignoring these steps can lead to corrosion, poor connections, and ultimately, battery switch failure.
- Visual Inspection: Once a month, visually inspect the battery switch for any signs of corrosion, loose connections, or damage to the switch itself. Look for any discoloration, bulging, or cracks in the plastic housing.
- Connection Tightness: Check that all terminals and connections are securely tightened. Loose connections are a major source of problems. Use a wrench, not pliers, to avoid damaging the terminals.
- Cable Condition: Inspect the battery cables for any signs of fraying, cracking, or damage. Replace any damaged cables immediately.
- Battery Terminal Cleaning: Clean battery terminals with a wire brush and baking soda solution to remove corrosion. Apply a corrosion inhibitor to prevent future corrosion.
- Switch Operation: Regularly test the switch functionality. Ensure it switches smoothly between the various positions (battery, both, off, shore power).
Cleaning and Inspecting the Battery Switch ConnectionsCorrosion is the enemy of good electrical connections. Regular cleaning prevents buildup that can lead to poor contact and reduced power flow, potentially damaging your batteries.Cleaning the connections involves several steps. First, disconnect the negative battery cable from the battery. This is crucial for safety to prevent accidental short circuits. Next, use a wire brush to remove any corrosion from the terminals and the switch connection points.
So, you’re an audiophile who travels? Awesome! Check out this guide on building the perfect audiophile travel setup for pristine sound on the go. It’s all about packing light but smart. Then, for some cool, handcrafted accessories to complement your portable setup, browse this site for ideas on a audiophile travel setup with a unique, artisan touch.
Remember, great sound shouldn’t be confined to your home!
A baking soda paste (baking soda mixed with water) can be helpful for stubborn corrosion. After cleaning, apply a corrosion inhibitor, like dielectric grease, to protect the cleaned surfaces. Finally, reconnect the negative battery cable, ensuring all connections are tight. Remember to always disconnect the negative terminal first and reconnect it last.Common Problems Associated with Battery Switches and Their SolutionsSeveral common problems can arise with battery switches, ranging from simple loose connections to more serious internal failures.
- No Power: This is often due to a blown fuse, a loose connection, or a faulty switch. Check the fuses first, then inspect all connections for tightness and corrosion. If the problem persists, the switch itself may need replacing.
- Intermittent Power: This suggests a loose or corroded connection. Thoroughly clean and tighten all connections. If the problem continues, the switch may be faulty.
- Switch Sticking: If the switch is difficult to move or gets stuck in one position, it may need lubrication or replacement. Try a small amount of electrical contact cleaner (following the manufacturer’s instructions). If that doesn’t help, replacement is likely necessary.
- Excessive Heat: A battery switch that generates excessive heat indicates a problem with a high-resistance connection. Check all connections and clean them. If the heat persists, the switch itself may be faulty.
Troubleshooting Flowchart for Diagnosing Battery Switch IssuesA systematic approach is key to efficiently troubleshooting battery switch problems. This flowchart provides a step-by-step guide.Imagine a flowchart with the following steps:
1. Start
So, you’re an audiophile who travels? Awesome! Check out this guide on creating the perfect audiophile travel setup for pristine sound on the go. It’s all about packing smart and prioritizing quality. But what if you need some portable, high-quality accessories? Then you might want to look at this other resource on building a killer audiophile travel setup , focusing on lightweight and durable components.
Remember, good sound doesn’t have to be bulky! Get ready to enjoy your music, no matter where your adventures take you.
Check if the battery switch is in the correct position.
2. No Power
Check fuses. If blown, replace and retest. If not blown, proceed to step
3. 3. Still No Power
Check all battery connections for tightness and corrosion. Clean and tighten as needed. Retest.
4. Still No Power
Check the battery switch itself for damage or malfunction. If damaged, replace the switch.
5. Intermittent Power
Check for loose or corroded connections. Clean and tighten as needed.
6. Switch Sticking
Try using an electrical contact cleaner. If the problem persists, replace the switch.
7. Excessive Heat
Check connections. If heat persists, replace the switch. Problem Solved? Yes – End. No – Consult a professional.
Safety Considerations When Working with Battery Switches
Working with the electrical systems in your travel trailer, especially the battery and its switch, requires careful attention to safety. A seemingly small mistake can lead to serious injury or damage to your RV. This section details crucial safety precautions to protect yourself and your equipment.
Disconnecting the Battery, Battery switch on travel trailer function
Before working on your travel trailer’s battery switch or any other electrical component, always disconnect the battery. This is the single most important step to prevent electrical shocks and short circuits. To safely disconnect the battery, first locate the negative (-) terminal. Always disconnect the negative terminal first. Use a wrench of the appropriate size to loosen the nut securing the negative cable clamp.
Carefully remove the cable from the terminal. Then, repeat the process for the positive (+) terminal. Remember, always disconnect negative first, connect positive last. This helps prevent accidental sparking and short circuits. After disconnecting the battery, visually inspect the terminals and cables for any signs of corrosion or damage.
Preventing Electrical Shocks and Short Circuits
Working with 12V systems is generally safer than higher voltages, but it’s still crucial to take precautions. Always wear insulated gloves when handling battery terminals or cables. Avoid wearing loose clothing or jewelry that could accidentally contact exposed wires or terminals. Keep the work area clean and dry to minimize the risk of accidental shorts. If you’re unsure about any aspect of the process, consult a qualified electrician or RV technician.
Never work on electrical systems while it is raining or in damp conditions. Moisture significantly increases the risk of electrical shock.
Potential Hazards of Incorrect Battery Switch Usage
Improper use of the battery switch can lead to several dangerous situations. For instance, accidentally leaving the switch in the “on” position while performing maintenance could result in unexpected electrical current flow, potentially leading to shocks or short circuits that damage your RV’s electrical system. This could cause fires or severe damage to sensitive electronic components. Another scenario is forgetting to switch the battery off before working on the electrical system, leading to accidental contact with live wires, resulting in severe burns or electrocution.
Incorrectly connecting the battery cables after maintenance could also lead to short circuits, causing sparks and potentially starting a fire. Imagine a scenario where a loose cable sparks near flammable materials, like insulation or propane lines. The consequences could be catastrophic. Always double-check your work before reconnecting the battery.
Knowing your travel trailer’s battery switch is more than just a technical skill; it’s about ensuring safe and reliable power for your adventures. By understanding the different types, proper operation, and maintenance, you can avoid frustrating breakdowns and enjoy worry-free camping. So, take the time to familiarize yourself with your system – your future self will thank you!
Query Resolution
What happens if I leave my battery switch in the “off” position?
Leaving your switch off completely disconnects your house batteries from the rest of your trailer’s electrical system. This prevents power drain but also means you won’t have any power to your appliances or lights.
Can I use a battery switch with a lithium battery?
Yes, but be sure the switch is compatible with the higher voltage and amperage of lithium batteries. Some switches are specifically designed for lithium and offer features like battery management systems (BMS) compatibility.
How often should I inspect my battery switch?
At least once a year, or more frequently if you notice any issues. Check for corrosion, loose connections, and ensure it operates smoothly.
My battery switch is making a clicking sound. What’s wrong?
A clicking sound often indicates a problem with the switch itself, a low battery voltage, or a short circuit somewhere in the system. Check your battery voltage and connections before attempting further troubleshooting.
